 A worm composter transforms vegetable scraps into valuable fertilizer.
Worms may have a bad reputation for being...well, worms...but they are actually unsung heros of the garden. For millenia, worms have been breaking down complex organic material and converting it to usable compost. When brought inside to the confines of a compost bin, worms can create a nutrient-rich soil amendment that your houseplants, veggie garden, perennials, and flower containers will LOVE.
Why Compost With Worms?
Composting kitchen scraps in a worm bin (vermiculture) is easy and rewarding. Even if you already have an outdoor compost bin, having a worm bin makes good sense:
-
Worms work FAST: Worms can convert most kitchen scraps to finished compost in less than two weeks.
-
Worms work ALL WINTER LONG: Keep a worm bin in your basement, garage or pantry (above 55 degrees and below 80 degrees F) and your worms will keep making compost right through the winter months.
-
Worm castings are RICH: Top dress any of your indoor or outdoor plants with some finished worm compost and watch what happens. You'll get better results than with any commercial fertilizer.
What Do You Need To Compost With Worms?
If you'd like to try your hand at worm composting, here are the four things you'll need to get started:
1. A Worm Bin
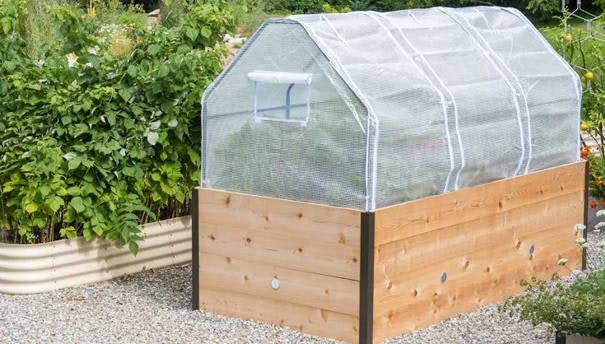
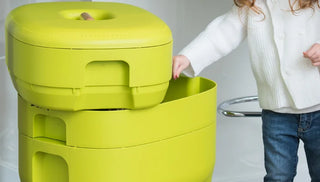
There are two basic options. The first is to have a series of shallow, stacked bins with screening on the bottom of each bin. When the worms have finished digesting the food scraps in the first bin, they will move into the bin above, in search of fresh, undigested food. Once the worms have moved out, the finished compost can be removed. Move the empty bin down and refill it with bedding material and kitchen scraps. A commercial version of this design is the Worm Farm Composter. The other option is to use one large, shallow box with a lid, ventilation holes on the sides and drain holes on the bottom. The bin should be opaque (worms don't like light) and have a cover to retain moisture and keep out light. Food is added to one side of the bin at a time so the worms have time to consume each new addition. A large plastic storage container works quite well (20" x 30" is a good size to start with). Remember to drill plenty of holes?at least 8 half-inch holes in the bottom and about the same number in the sides. Put a tray beneath the bin to catch any drips.
2. Bedding Material (Carbon)
Just like in a regular compost pile, it's important to maintain a balance of carbon and nitrogen inside your worm bin. The purpose of the bedding material is to provide a food source for the worms, to moderate moisture levels in the bin, to control odor, and to ensure good aeration. The bedding material for a worm bin is usually shredded newspaper or dry leaves.
 When rehydrated, this coir brick expands to about 10 dry quarts of worm bedding.
To avoid odors and keep worms working efficiently, add a handful of this carbon-rich bedding material each time you add kitchen scraps. This is easy if you stockpile a few trash bags full of shredded paper or crushed dry leaves. To prevent matting, pieces should be no more than about 1-inch square, so if you're using paper from a shredder, you may need to chop it up into shorter lengths. Another good choice is Coir Worm Bedding, which comes in easy-to-use bricks.
3. Kitchen Scraps (Nitrogen)
Most worm bins are appropriately sized to compost one household's kitchen waste. Yard and garden refuse is best dealt with in an outdoor bin (your worms won't be able to handle that volume). You can feed your worms any kind of vegetable scraps (either raw or cooked), coffee grounds and tea bags. To avoid problems with fruit flies, make a habit of putting all fruit in your outdoor compost bin. Other things to keep out of your worm bin (add them to your outdoor compost bin instead): eggshells (the worms can't digest them), bread (it absorbs moisture and gums up), meat and dairy products, oils and any very fatty foods (difficult for the worms to digest).
4. Worms
The right worms for a worm bin are called red wigglers, also known as Eisenia foetida. Unlike other types of worms, this special species thrives at 55 to 77 degrees F. When provided with adequate food and the right living conditions, a pound of red wiggler worms will digest 0.5 to 1 lb. of kitchen scraps per day. Within a few weeks after they get settled into a new worm bin, the worms will mate, lay eggs and begin to multiply. You should have a plentiful supply of worms (and plenty of extras to share) for many years to come. If you know someone with a worm bin, they'll probably be happy to share some extra worms to help you get started.
How To Set Up Your Worm Composter
- Fill a bin half full of moistened bedding material. The moisture content of the bedding material should be that of a well-wrung sponge. Sprinkle some coffee grounds or a cup of sand on top to provide grit for the worms' bellies.
- Settle the worms on top and then cover the bin and let it sit for a week before adding any kitchen scraps.
- Chop, cut or tear about 4 cups of kitchen scraps into 1-inch chunks. Sprinkle scraps onto the surface of the bedding material and then cover the scraps lightly with some new bedding material. Wait several days before adding any more scraps, allowing the worms to get started.
Remember that worms can't eat the food scraps until the scraps start to decay. If you overload the worm bin, your worms won't be able to keep up and you'll soon have a smelly, soggy bin of rotting food scraps.

Tips for Successful Worm Composting
- Once the worms in your bin begin to multiply, you'll be able to add a layer of food scraps as often as once a day, always covering them with a small amount of bedding material to absorb excess moisture and control odors. As an alternative to layering, you can also lift up some of the material already in the bin and nestle some fresh food scraps and a little fresh bedding material underneath. Lifting up the material in this way also helps to incorporate fresh oxygen, which the worms will appreciate.
- Locate your worm bin in a place where the air temperature is between 50 and 80 degrees. During the summer months, it's best to put the bin in a shady spot outdoors. When the weather turns colder, you'll want to move your bin to the basement or a heated garage. In cooler temperatures, the worms will work much more slowly and you may need to decrease the amount of food scraps that you add each week. If you want to keep the volume up, find a warmer winter location for the worm bin, such as in a corner of your kitchen, pantry or back hall.
- It's worth taking a minute to chop or tear up any large chunks of vegetables before adding them to the bin. Make a habit of blending fresh food scraps with some dry bedding material. Clumps of wet scraps that are not well distributed, will rot and start to smell.
- Avoid adding acidic fruit (i.e. citrus) which may cause your worms to leave the bin.
- Worms can suffocate if the bedding gets to be too wet or compacted. Replace compacted bedding with fresh, dry material, and place the worms on top; let them dig their own tunnels.
- If there is still a lot of undigested food in the bin after a week or two, the worms may be receiving more than they can handle. Store excess food scraps in the freezer until your bin empties out a bit.
How to Use Finished Worm Compost
When your bin begins to fill up with finished compost, it's time to remove that material and make room for more composting action. The challenge is to separate the worms from the finished compost. There are two ways to do this:
- The first is to dump the material onto a tarp or sheet of plastic and pick out the worms, putting them back into the bin.
- The second option is to simply remove the lid and expose the finished compost to light and air. Since the worms will want to seek out darkness and moisture, you just need to provide a way for them to burrow down or across into a more desirable area. Over the course of a week or so, you'll be able to gradually remove the finished compost, picking out any confused worms and throwing them back.
Finished worm compost can be stored in a plastic bag or tub. Use it to top-dress beds, blend it into potting soil for your patio flower baskets, or combine it with transplant mix once your seedlings are ready for larger growing cells. Try making a basic compost tea, which is chock full of beneficial bacteria and nutrients, and can be watered in to the soil or applied directly to the plant leaf. Compost tea has been shown to improve plant growth and disease resistance. Steep some of your finished worm compost in clean, dechlorinated (think rainwater, not treated municipal tap water) water for 24 hours. The tea should be light brown in color, and, since it is full of living microbes, should be applied to your plants within a day of making.