The magic of composting is that… it’s not magic at all! When we compost, we are simply speeding up nature’s normal decomposition process by providing the perfect conditions for decomposers to work. A process that takes decades (or longer!) in a forest, now takes just a few months in your yard.
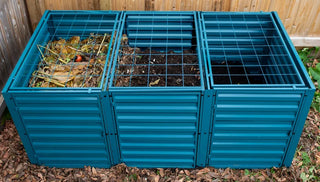
The beauty of a multi-bin (most often, 3 individual bins) composter lies in the ability to pull out finished, ready-to-use compost at any time, while simultaneously building new batches of compost with fresh scraps. When composting in a single bin, the continuous addition of fresh kitchen and garden scraps slows the decomposition process down. Using multiple bins allows you to optimize the breakdown journey of your scraps from whole organics to nutrient-rich finished compost with maximum efficiency!
Bin 1: Fresh Beginnings
Bin 1 is where you add kitchen and yard scraps. Maintaining a “brown” layer on top helps retain moisture.
To begin, add fresh kitchen scraps and garden waste to Bin 1. Successful compost requires both “greens” and “browns.” Greens are chock full of moisture and nitrogen, and include items such as grass clippings, fruit and veggie scraps from the kitchen, deadheaded flowers, and coffee grounds. Browns are high in carbon and help provide structure for your compost. Wood shavings, dried leaves, twigs, and shredded plain cardboard are all easy-to-source browns. Aim for 2-3 parts brown for every 1 part green.

Depending on how much kitchen and garden waste your household generates, it can take between 2 weeks to 2 months to fill the first bin. As Bin 1 starts to fill up, you may notice it is generating some heat as well as height. Decomposers give off heat as they digest your scraps. A steamy compost pile is a sign that things are cooking, and the billions of decomposing bacteria are happy in their compost home. With a compost thermometer, you may see temperatures between 130°F and 150°F!
When To Move to Next Bin: Once the temperature of Bin 1 has peaked, use a shovel or broadfork to flip most of this semi-cooked pile into Bin 2. (Leave some of the good stuff to prime fresh scraps with beneficial microorganisms!

Bin 2: Let’s Get Cooking
The material in Bin 2 should be mostly broken down, although eggshells and fibrous stalks may still be visible.
Bin 2 is where things really start breaking down. When you move the contents over to Bin 2, you are accomplishing three things:
- You’re freeing up space in Bin 1 for fresh, new scraps.
- You're mixing in the undigested material from the outside of the Bin 1 pile.
- You’re adding oxygen to the pile.
Composting is an aerobic process — meaning, your decomposers need oxygen to do their job! Bin 2 is a perfect time in the composting process to aerate your pile, using a pitchfork or a specialized compost aerator. But for the most part, you can just leave it alone and… let it cook!
To speed up this process, you can add either our Super Hot Compost Starter, or which “revs up” your compost pile with nitrogen and beneficial microorganisms, or a microbe-based booster like Re-Gen Compost Accelerator. In as little as a week, but up to 2 months, your pile will have broken down until it’s mostly uniform-looking and there are hardly any recognizable scraps — though eggshells and fibrous stalks may still be visible.
Be sure to continue adding fresh kitchen and garden waste only to Bin 1. Adding fresh scraps to this semi-cooked pile will only slow the process down.
When To Move to Next Bin: When the pile in Bin 2 starts to look like, well, compost — that is, mostly uniform texture and color except for some more substantial scraps — it’s time to move it along to Bin 3 for curing.
Bin 3: Gardener’s Gold
After some final curing, Bin 3 is where your finished compost lives.
Depending on your composting environment, it may take 1-2 months in this final bin to cure. Finished compost is dark in color, crumbly in texture, and has an earthy smell. If there are still any bulky scraps holding out on you, use a compost sifter to separate the garden-ready stuff from the pieces that still need to cook a bit longer.
“But what if I…?” Don’t overthink this process! Like every other aspect of gardening, from planting to harvesting, there is always an element of trial and error. Troubleshooting the compost pile is part of the magic. And with a 3-bin system — you get 3 times as many opportunities to get it right!

What To Do With Finished Compost: Completely finished compost should be used in raised beds or containers, or for transplanting seedlings. If you don't mind coming across an occasional fragment of eggshell, slightly “unfinished” compost can be used to top dress your veggie beds.
Multi-Bin Compost Systems: Buying vs. Building Your Own DIY System
There are plenty of designs out there for multi-bin composters that utilize wooden pallets. While we love to reuse and repurpose items that would otherwise end up in a landfill, many wooden pallets are painted or chemically treated as part of the pressure-treating process. Those chemicals can leach into your compost and ultimately end up in your garden bed. Not good.
The Demeter Multi-Bin Composter offers a stylish, durable way to tackle multi-bin composting that’s also safe to use in your edible or flower garden bed. Constructed of sturdy galvanized metal, the Demeter stands up to wind, snow, and persistent wildlife keen on invading your compost pile. Top hatches and latching side doors allow easy access to all three bins.
Prefer the look of wood? The Cedar 3-Bin Composter is made of rot-resistant cedar and our very own rust-proof Lifetime Aluminum corners. A slatted design allows good air and water flow to help the composting process along, and front access panels lift up and stay in place so you can harvest garden-ready compost. Check it out below:
Multi-Bin Composting FAQs
If you’ve hit a wall or you’re still feeling nervous about getting started, we’re here to help you… break it down!
What should I do if I notice a funky, ammonia-like smell in Bin 1?
You may have too much nitrogen-rich scraps at the moment. Try adding more “browns”, like dried leaves or wood shavings, to increase the carbon to nitrogen ratio of your pile.
What should I do if my compost looks dry or dusty?
If your “greens” aren’t bringing enough moisture to the pile, you may need to give your compost decomposers a drink of water. Use a hose or watering can to moisten the pile so it resembles a damp sponge.
What should I do if I see bugs in my bins?
Congrats! Creepy, crawly invertebrates (slugs, red worms, millipedes, etc.) are members of the decomposers club and their presence is a sign that your pile is well on the way to becoming finished compost. To avoid attracting nuisance houseflies (as well as other wildlife), do not put meat or bones into your pile.
What should I do if I see too many large chunks in Bin 3?
If the chunks are mostly wood chips, this compost will make an excellent thin mulch to layer on perennial beds or under newly planted shrubs. If you are seeing recognizable food (corncobs, avocado pits, melon rinds, etc.), let the pile cook a little longer and make a mental note for next time to chop up tougher materials before adding them to Bin 1.