 Ripe cantaloupes have a sweet, musky aroma.
One of the best things about growing your own melons, is that you can pick them at the peak of flavor, when the sugars are most concentrated. Unlike many other types of fruit, melons get softer once they have been picked, but they do not get any sweeter. The trick to harvesting melons is figuring out when that moment of peak flavor occurs, because each type of melon displays different sorts of clues to its ripeness.
How to Tell if a Cantaloupe is Ripe
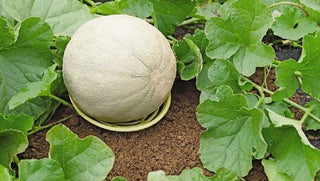
In most cases, when cantaloupes and muskmelons are ripe, they detach themselves from the vine, leaving a dish-shaped scar on the fruit where the stem was attached. The fruit will also develop a sweet, musky aroma when ripe. This scent may be hard to detect in the cool of the morning, so if possible, wait until later in the day to harvest. The rind should be straw-colored, but may still have some green showing.
 A perfectly ripe cantaloupe
How to Tell if a Honeydew is Ripe
These green-fleshed melons don't slip from the vine or develop a strong aroma, so ripeness is a bit more difficult to detect. When ripe, the color of the rind should be a creamy yellow rather than green, and the rind will become smooth and waxy rather than dusky. If you press on the bottom of a ripe honeydew (the opposite end from where it's attached to the vine), it should feel slightly soft or at least a little springy. In the warmth of a sunny day, you may also be able to smell that a honeydew is ripe. When you decide the time has come, cut the melon from the vine with a scissors or a pruning shears.
How to Tell if a Watermelon is Ripe
Like honeydews, these melons don't have a scent or slip from the vine when they're ripe, but they do provide several clues that tell you they're ready to eat. Look for the small leaf and stem-like curl that occur near where the melon is attached to the vine. When watermelons are ripe, this leaf and tendril will turn brown and dry. In many cases, the part of the watermelon that's resting on the ground will also turn yellow.
More Tips for Growing Magnificent Melons
Wait for warm days: Melons grow best and develop the sweetest flavor when the weather is warm, sunny, and relatively dry. If you're in a challenging melon-growing climate, be sure to plant varieties that are particularly suited to your growing region. Seeds can be started indoors before the soil warms up, or can be seeded directly in the garden when the weather has settled. If you do start seeds indoors, do it no more than 4-5 weeks before they'll be transplanted outdoors.
No heavy soils, please: Melons grow best in well-drained, loamy soil. Amend the soil in the planting area with compost and then create a 12” x 12” mound that's about 6" higher than the surrounding soil. Try growing melons in a raised bed, so you can have control over soil quality and drainage.
Don't skimp on water: Melons need plenty of moisture in the early part of the season. Whatever watering system you choose, be sure to water regularly to prevent the soil from drying out. Once melons approach the ripening phase, they need hot, dry, sunny weather to intensify their quality and flavor. It's best to minimize supplemental watering during this time.