Have you ever started some seeds, dutifully setting up your grow light and diligently bottom watering your trays only to wait weeks with not a single sprout in sight? Did you bemoan your failed seeds to your master gardener next door, only to have them ask, “did you need to stratify the seeds?”
Some seeds require a temperature change to trigger the end of dormancy and the start of germination. Dormancy is the seed's “resting state”, where all growth is paused. Stratification occurs naturally when seeds overwinter outdoors under snow or freezing temperatures. Warm spring temperatures break the seed out of its dormancy. For plants that produce seeds in the fall, this is a survival technique that prevents seeds from starting to sprout on an unusually warm fall day only to get zapped by frost the next — they need weeks (or months) of rest at chilly temps first.
Gardeners can mimic nature’s seasonal cycle on a shortened, predictable timescale by stratifying seeds themselves. Stratification periods vary greatly between plants with some needing just a few weeks in the cold, and others needing several months. Some plants require multiple cold-warm cycles before they successfully germinate; Trillium can take 2-3 years for a seedling to appear (we applaud your patience if you’re trying this one!). Research your plant and read your seed packet carefully for the required stratification time — some packets will say “prechilling”, “cold treatment”, or “cold stratify”, but all refer to the same process.
Plants That Require Cold Stratification for Spring Planting
Many cold-climate native perennials, grasses, shrubs, and trees require some type of cold stratification. “Cold dry stratification” subjects the seeds to temperatures of 32 degrees F or colder; “cold moist stratification” occurs at slightly warmer temps (33-40 degrees F) under, you guessed it, damp conditions. If you are directly sowing your seeds in the fall, no stratification is necessary — winter will take care of things all on its own.
| Common Name | Scientific Name | Type of Stratification |
|---|---|---|
| Anise hyssop | Agastache foeniculum | Dry |
| Black-eyed Susan | Rudbeckia hirta | Dry |
| Blue lobelia | Lobelia siphilitica | Moist |
| Blue Vervain | Verbena hastata | Moist |
| California popy | Eschscholzia californica | Dry |
| Columbine | Aquilegia spp. | Moist |
| Common Milkweed | Asclepias incarnata | Moist |
| False indigo | Baptisia australis | Dry |
| Lupine | Lupinus perennis | Moist |
| Pale Purple Coneflower | Echinacea pallida | Moist |
| Purple Coneflower | Echinacea purpurea | Dry |
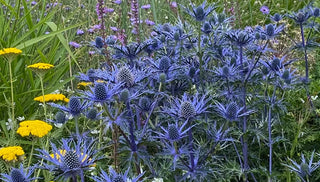
| Sea holly | Eryngium planum | Moist |
| Turtlehead | Chelone spp. | Moist |
| Virginia bluebells | Mertensia virginica | Moist |
| Wild geranium | Geranium maculatum | Moist |
Winter is Coming (Sort of...)
Did you miss the fall seeding period? Good news! Gardeners can trick a seed into thinking it's enduring a season of winter with just a refrigerator and a few simple household materials. Here is what you need to “get stratified”:
- Seeds
- Stratification medium — this can be clean sand, peat moss, coir, vermiculite, or a paper towel
- Sealable plastic bag or container
- Water
- Marker or pen
How to Cold Stratify Seeds
To prepare them for a summer planting out in the garden, we cold stratified Sea Holly (Eryngium planum) seeds. These seeds were chilled in a refrigerator for 4 weeks — each plant has a different chilling requirement, so be sure to read seed packets before getting started.
- Place your chosen stratification medium in a large sealable plastic bag or container. Coir was used here.
- Pour in a small amount of water and mix so the medium is consistently moist. The medium needs to be slightly damp; if you can wring water out, it’s too wet.
- Add your seeds. Sea Holly requires light for germination, so these seeds were sprinkled on top of the coir and gently pressed in.
- Seal the container or bag and label it with the date and plant variety. Otherwise, your family might assume it’s leftovers.
- Place your container of seeds in the refrigerator at 33-40 degrees F (do not freeze).
- Check your seeds periodically (we know you’ll want to!) and remove anything that appears moldy. If some of your seeds have sprouted, remove and plant as normal in a seed starting tray with fresh seed starting mix.
- Remove seeds from their chilly storage.
- If you chilled seeds in a medium like coir or vermiculite, simply place your seeds under a grow light to get them going. If you chilled seeds on a paper towel, gently pot them up in your favorite seed starting mix first.